
How To Resize An Image In Photoshop CC
In this second tutorial on image resizing in Photoshop CC (Creative Cloud), we'll learn how to resize our images using the Image Size command. We'll also learn the important difference between resizing an image and resampling an image, and how the resolution value of your image determines its print size. At the end of the tutorial, we'll take what we've learned and use it to easily figure out the largest possible size that you can print your photo and still get professional looking results!
We took a quick tour of Photoshop CC's newly redesigned Image Size dialog box in the previous tutorial, including a look at its new preview window, preset image sizes, and new interpolation options designed to maximize image quality, especially when enlarging an image. To get the most from this tutorial, I recommend reading through the previous one before you continue if you haven't done so already.
Also, just a quick reminder that this series of tutorials is for Photoshop CC, available only with an Adobe Creative Cloud subscription. Users of Photoshop CS6 or earlier will want to read our original How To Resize Images In Photoshop tutorial and other related tutorials in our Digital Photo Essentials section.
As you may know, digital photos are made up of pixels, tiny colored squares arranged in such a way that when viewed from a far enough distance, they create the appearance of a continuous image. When we talk in general about resizing a digital photo, there's really two very different things we could be talking about. We may want to simply change the size at which our digital image will print without changing the number of pixels in the original image. Or, we could be talking about actually changing the size of the digital image itself, making it larger or smaller by adding or removing pixels.
Even though both of these options are often (and incorrectly) lumped together under the term "image resizing", resizing refers specifically to that first option I mentioned, changing the size at which the digital image will print without changing the number of pixels in the image. On the other hand, if we're changing the size of the digital image itself, adding or removing pixels as needed (or in other words, changing its pixel dimensions), that's known by another name - image resampling.
Since resampling an image is a bit more involved than simply resizing it and changing its print size, I've split these topics into two separate tutorials. Here, we'll cover the options in Photoshop CC's Image Size dialog box that control print size. In the next tutorial, we'll expand on what we've learned here and cover everything we need to know about resampling, including the all-important interpolation options that can have a major impact on the quality and appearance of the final image.
For now though, we'll keep things simple. Here's a photo I have open in Photoshop CC (kids in leaves photo from Shutterstock):

To resize (or resample) an image, we use Photoshop's Image Size command. To get to it, go up to the Image menu in the Menu Bar along the top of the screen and choose Image Size. Or, press Ctrl+Alt+I (Win) / Command+Option+I (Mac) on your keyboard to access the Image Size command with the handy shortcut:

This opens Photoshop CC's newly redesigned Image Size dialog box, complete with a new preview window on the left:

Since my preview window is currently centered on part of the image that isn't very helpful, I'll click inside the preview window and, with my mouse button held down, I'll drag with my mouse to move the image around inside of it:

We can also zoom in and out of the image within the preview window. Move your mouse cursor anywhere within the boundaries of the preview window and a bar appears along the bottom. Click the bar's plus icon ( + ) to zoom in on the image or the minus icon ( - ) to zoom out. The current zoom level is displayed between the two icons. The default zoom level is 100%, but here, I've zoomed out to 25%:

And now that we've spent some time discussing the preview window, here's a bit of secret (okay, so it's really more of a helpful tip than a secret). When we're simply resizing an image (changing the size at which it will print), we don't actually need the preview window for anything. It's a great feature and as we'll see in the next tutorial, it does come in very handy when we're resampling images (adding or removing pixels). But simply changing an image's print size, as we're learning how to do here, has no effect on the digital image itself. It keeps its original number of pixels, and those pixels are not touched or harmed in any way. So, since we're not doing anything to the image itself, there's really nothing to preview and no real use for the preview window at the moment (that will change, though, in the next tutorial).
To the right of the preview window is where we find the various image size options along with some general information about our photo. At the very top, we see its current file size in megabytes (M) and the current dimensions of the image in pixels (px). Here, we see that my image is currently taking up 34.5 megabytes in my computer's memory, and it has pixel dimensions of 4256 x 2832. As we'll see, since all we're doing is changing the print size of the photo, its original file size and pixel dimensions should not change at all:

Turning The Resample Option Off
If you look down below the Width, Height and Resolution options (which we'll look at in a moment), you'll find the important Resample option. This single option controls whether we're resizing or resampling the image. By default, it's enabled (checked) which means we'd be changing the number of pixels in the image if we leave it enabled. We don't want to do that. We're only interested in changing the print size of the image for now, so click inside its checkbox to uncheck it and turn the option off:

Width, Height And Resolution
With Resample turned off, we can now change the print size of the photo using the Width, Height and Resolution options:
Let's look at how these three options (Width, Height and Resolution) work together to control the print size. The Width and Height options are pretty straightforward. Width determines how wide the image will print, while Height sets how tall it will print. It's important to note, though, that since we're not changing the size of the digital image itself, the aspect ratio (that is, the relationship between the width and height of the image) remains locked in place. What that means is, if we enter a new value for the width, Photoshop will automatically enter a new value for the height to match the original aspect ratio. And vice versa, if we enter a new value for the height, Photoshop will automatically enter a new value for the width.
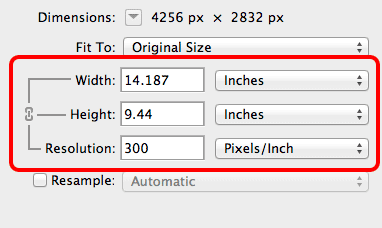
For example, right now the Image Size dialog box is telling me that my image is set to print 14.187 inches wide x 9.44 inches tall. Let's say I want it to print only 10 inches wide. To change any of the current values, we simply need to double-click inside the box, which will highlight the current value, and then type in the new value. I'll double-click inside the Width box and enter in my new value of 10 (inches). When I do, Photoshop automatically changes the Height value to 6.654 inches in order to keep the aspect ratio the same:

If I wanted the photo to print as a standard 4x6, I could double-click inside the Height box to highlight the current value and then type in my new value of 4 (inches). Again, to keep the original aspect ratio the same, Photoshop automatically changes the Width value to 6 inches (or in this case, 6.011 inches which is close enough:

Now, here's what's interesting. If we look back up at the top of the dialog box, we see that even though I'll now be printing the photo at a much smaller size, its actual pixel dimensions have not changed. The digital image itself is still 4256 px wide by 2832 px tall. Its file size, in megabytes, also has not changed:

The Resolution Value
How is that possible? If there's still the exact same number of pixels in the photo as there was originally, how is it printing smaller? Well, you may have noticed that each time I changed the width and height of the photo, something else automatically changed as well - the Resolution value. If you didn't notice, go back and take another look at the screenshots (I'll wait). At its initial print size of 14.187 inches x 9.44 inches, the Resolution value was 300 pixels/inch. When I reduced the print size to 10 inches x 6.654 inches, the Resolution suddenly increased to 425.6 pixels/inch. And when I reduced the print size even further, down to 6.011 inches x 4 inches, the Resolution value shot all the way up to 708 pixels/inch. Why is that?
Notice that the Resolution value is listed in "pixels/inch" (or "pixels per inch"). That's because what the Resolution value tells us is how many of the image's pixels are going to be printed inside every inch of paper. Since all we're doing is resizing the image (not resampling it), we can't change the number of pixels in the image. So, if we want the image to print smaller and we can't change the number of pixels, we simply squeeze more pixels into the same amount of space (in other words, into every inch of paper). Likewise, if we want it to print it larger, we squeeze fewer pixels into every inch.
It's actually very easy to figure out what the Resolution value needs to be to print an image at a specific size. All we need to do is take either the width or height of our image, in pixels, and divide it by the width or height that we want it to print, in inches. For example, let's look again at what the Image Size dialog box was initially telling me. At the top, we see that the pixel dimensions of the photo are 4256 px x 2832 px, while the Width, Height and Resolution options tell us that the image will print 14.187 inches x 9.44 inches at a resolution of 300 pixels/inch:

Where did that value of 300 come from? If we take the width of the image in pixels (4256) and divide it by the width it will print in inches (14.187), then 4256 ÷ 14.187 = 299.993, which rounded up is 300. Let's do the same thing with the height, taking the photo's height in pixels (2832) and dividing it by the print height in inches (9.44). Using my handy calculator, 2832 ÷ 9.44 = 300, exactly what the Resolution value is showing us. This means that 300 of the photo's pixels from top to bottom, and 300 of the pixels from left to right, will be printed in every square inch of paper. At that resolution, it will take 14.187 inches x 9.44 inches of paper to fit the image.
When I reduced the print size to 10 inches x 6.654 inches, the Resolution value increased from 300 pixels/inch to 425.6 pixels/inch. Again, where did that 425.6 value come from? We just take the width of the photo in pixels (4256) and divide it by the new print width in inches (10). 4256 ÷ 10 = 425.6. If we do the same thing with the height in pixels (2832), dividing it by the new print height in inches (6.654), 2832 ÷ 6.654 = 425.6. This means that 425.6 image pixels from top to bottom, and 425.6 pixels from left to right, will need to be printed inside every square inch of paper to print a 10 inch x 6.654 inch version of the image:

Finally, reducing the print size even further to 6.011 inches x 4 inches caused the resolution value to jump up to 708 pixels/inch. If we check the width, 4256 pixels ÷ 6.011 inches = 708 pixels/inch. And checking the height, 2832 pixels ÷ 4 inches = 708 pixels/inch. Our own calculations match up perfectly with what the Image Size dialog box showed us. And that, really, is the basics of resizing an image and changing its print size. Simply uncheck the Resample option, enter either the width or height that you need your image to print (in inches), and Photoshop sets the other values for you automatically:

Resolution And Image Quality
As we've seen, when resizing an image (changing only its print size), the Width, Height and Resolution options in the Image Size dialog box are all linked together. Change one of the values and Photoshop automatically changes the others, and that includes the Resolution value. In most cases, you'll want to let Photoshop figure out the resolution automatically when you enter in a new width and height, but we can manually enter the Resolution value ourselves to see how large we'd be able to print the image and still get professional-looking results.
In general, if you're printing the image using an inkjet photo printer (the kind you most likely have at home), the lowest resolution value you'd want to use is around 240 pixels/inch. If you go much below that, your printed image will start looking too soft and dull. So, knowing that 240 pixels/inch is the lowest resolution value I'd want to use, I can simply enter 240 into the Resolution option. When I do, Photoshop automatically changes the Width and Height values to match the resolution and shows me that I could safely print this image at a size of 17.733 inches wide by 11.8 inches tall, which is most likely larger than I'd need. But at least I know that as long as my intention is to print it smaller than 17.733 in x 11.8 in, the result will look great:

To learn more about how image resolution affects print quality, check out our full Image Resolution And Print Quality tutorial in the Digital Photo Essentials section of our website. And there we have it! That's how to change the print size of an image using the new Image Size dialog box in Photoshop CC! In the next tutorial, we'll take things further and cover everything you need to know about image resampling!