Photoshop Rain Effect – How To Add Rain To A Photo
This tutorial shows you how to easily add rain to a photo, and how to keep the rain effect non-destructive and fully editable using Smart Filters and adjustment layers. For Photoshop CC and CS6.
Like the rain but not the thought of damaging your camera? In this tutorial, you'll learn how to add rain to your photos with Photoshop! This simple rain effect can be a great way to add mood and atmosphere to an image, and without getting your camera wet. You'll also learn how to keep the rain effect fully editable using Smart Filters and adjustment layers in Photoshop. That way, you'll be able to go back and adjust the amount of rain, the direction the rain is falling from, and the overall brightness and contrast of the effect.
I'll be using Photoshop CC but this tutorial is fully compatible with Photoshop CS6. If you're using Photoshop CS5 or earlier, you'll want to check out our original Adding Rain To A Photo tutorial.
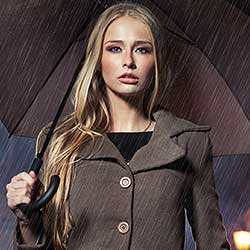
Here's the image I'll be using. I downloaded this one from Adobe Stock:
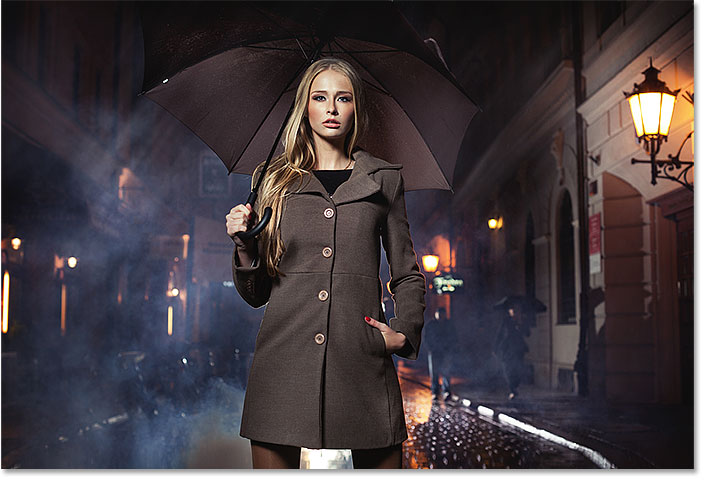
And here's what it will look after adding the rain:

Let's get started!
How To Add Rain In Photoshop
Step 1: Add A New Blank Layer
If we look in the Layers panel, we see our newly-opened image sitting on the Background layer:

Start by adding a new blank layer. Press and hold the Alt (Win) / Option (Mac) key on your keyboard and click the New Layer icon at the bottom of the Layers panel:

Holding the Alt (Win) / Option (Mac) key tells Photoshop to pop open the New Layer dialog box where we can name the layer before it's added. Name the layer "Rain", and then click OK to close the dialog box:

A new blank layer named "Rain" appears above the Background layer:
Watch the video and share your comments on our YouTube channel!
Step 2: Fill The New Layer With Black
We need to fill our "Rain" layer with black, and we can do that using Photoshop's Fill command. Go up to the Edit menu in the Menu Bar and choose Fill:

This opens the Fill dialog box. Set the Contents option at the top to Black. Make sure Mode is set to Normal and Opacity is at 100%. Click OK to close the dialog box:

Photoshop fills the "Rain" layer with black, temporarily hiding the image from view:

Step 3: Apply The Add Noise Filter
To create the rain effect, we'll use Photoshop's Add Noise filter to add a bunch of random dots (or "noise") to the layer. Go up to the Filter menu in the Menu Bar, choose Noise, and then choose Add Noise:

In the Add Noise dialog box, set the Amount value to 25%. In the Distribution section, choose Gaussian, and then select Monochromatic at the bottom of the dialog box, which limits the color of the noise to black and white. Click OK when you're done:

Photoshop fills the layer with noise. It's not very bright at the moment, but we'll fix that in a bit:

Step 4: Scale The Rain Layer To 400%
The dots are too small to look like rain, so let's make them bigger using Photoshop's Scale command. Go up to the Edit menu in the Menu Bar, choose Transform, and then choose Scale:

In the Options Bar, click the link icon between the Width (W) and Height (H) values. This links them together so that changing one will automatically change the other:
Set the Width to 400%. Photoshop sets the Height to 400% to match:

Click the checkmark in the Options Bar to accept the scaling:

With the "Rain" layer scaled to 400% of its original size, the dots are now much bigger:

Step 5: Change The Blend Mode To Screen
A big problem at the moment is that the noise is blocking our image from view. To fix that, change the blend mode of the "Rain" layer from Normal (the default blend mode) to Screen:

The Screen blend mode hides all the areas of black on the "Rain" layer, leaving only the white dots visible:

Related: Learn the 5 essential blend modes for photo editing.
Step 6: Convert The Rain Layer Into A Smart Object
We're going to change those white dots into falling rain using Photoshop's Motion Blur filter. But before we do, let's convert our "Rain" layer into a Smart Object. That way, the Motion Blur filter will be applied as a Smart Filter. This will let us experiment with the filter settings without making any permanent changes or losing image quality. With the "Rain" layer selected, click on the menu icon in the top right corner of the Layers panel:
Choose Convert to Smart Object from the menu:

Nothing will happen to the image itself, but if we look at the "Rain" layer's preview thumbnail in the Layers panel, we now see a Smart Object icon in the lower right corner. This is how Photoshop tells us that the layer is now a Smart Object:
Step 7: Apply The Motion Blur Filter
We're ready to add some motion to our rain effect with the Motion Blur filter. Go up to the Filter menu, choose Blur, and then choose Motion Blur:

This opens the Motion Blur dialog box. First, set the direction the rain is falling using the Angle option. You can enter a value directly into the box or turn the dial (it's more fun to turn the dial). I'll set my angle to 65°. Then, set the amount of motion blur using the Distance option. Drag the slider along the bottom to change the value and preview the results in your image. I'll set mine to 75 pixels but this will depend a lot on the size of your image. Don't worry about getting it exactly right for now because we can always change the value later if we need to. Click OK when you're done to close the dialog box:

Photoshop takes a few moments to apply the motion blur, and when it's done, the noise becomes falling rain:

And if we look again in the Layers panel, we see the Motion Blur filter listed as a Smart Filter below the "Rain" Smart Object:

Step 8: Add A Levels Adjustment Layer
To reduce the amount of rain, and add some brightness and contrast to the effect, we'll use a Levels adjustment layer. Press and hold the Alt (Win) / Option (Mac) key on your keyboard and click the New Fill or Adjustment Layer icon at the bottom of the Layers panel:

Choose a Levels adjustment layer from the list:

Photoshop again opens the New Layer dialog box, this time for the Levels adjustment layer. Select Use Previous Layer to Create Clipping Mask. This will clip the Levels adjustment layer to the "Rain" layer below it, which means we'll only be affecting the rain itself. The adjustment layer won't have any effect on the original image. Click OK to close the dialog box:

Looking in the Layers panel, we see the new Levels adjustment layer, named "Levels 1", above the "Rain" layer. The adjustment layer appears indented to the right with a small arrow pointing down at the "Rain" layer below it. This tells us that the adjustment layer is clipped to the "Rain" layer:

Related: How To Use Clipping Masks in Photoshop
Step 9: Drag The Black And White Point Sliders
The controls for the Levels adjustment layer appear in Photoshop's Properties panel. In the center of the panel is the histogram, a graph showing us the tonal range of the image (or in this case, of the "Rain" layer). If you look directly below the histogram, you'll see three sliders. There's a black slider on the left, a white slider on the right, and a gray slider in the middle. To adjust the rain effect, we only need the black and white sliders:

First, to reduce the amount of rain, click on the black slider and begin dragging it slowly towards the right. As you drag, you'll see the darkest areas of rain getting even darker, and eventually disappearing completely. Then, to brighten the rain that's still visible, click on the white slider and begin dragging it to the left.
You'll want to play around with the sliders a bit, going back and forth between them to find the settings that work best. But just like Smart Filters in Photoshop, adjustment layers are fully editable and non-destructive. This means you can always re-adjust the sliders later if you need to:

Here's my rain effect after dragging the sliders. There's now less rain overall, and the effect has more contrast:

Step 10: Re-Adjust The Motion Blur Or Levels Settings If Needed
You may find, after moving the sliders, that there's no longer enough motion being applied to the rain. To adjust the motion blur amount, double-click on the Motion Blur Smart Filter in the Layers panel:

This re-opens the Motion Blur dialog box. To add more motion, increase the Distance value. In my case, I'll increase it from 75 pixels to 150 pixels, but again, this will depend on the size of your image. You can also adjust the angle while you're here, but I'll leave mine set to 65°. Click OK when you're done to close the dialog box:

If, after adding more motion, the rain is now looking too faint, click on the Levels adjustment layer to reselect it. To make sure you're selecting the layer itself, not its layer mask, click on the histogram icon:

Back in the Properties panel, adjust the black and white sliders as needed to lighten or darken the rain and adjust its overall contrast. In my case, I'll leave the black slider alone and just drag the white slider a little to the right to brighten the effect:

And with that, we're done! Here, after fine-tuning the sliders, is my final Photoshop rain effect:
And there we have it! That's how to add rain to a photo with Photoshop! Did you know that the same steps can be used for other Photoshop effects? Try adding snow to photo or even adding stars to a night sky and I think you'll be amazed at how similar the steps really are! Or visit our Photo Effects section for more Photoshop effects tutorials!