
Create An Old Photo Effect in Photoshop
Learn how to easily turn a new photo into an old, antique or vintage photo using the Camera Raw filter in Photoshop CC or the main Camera Raw plugin in Photoshop CS6.
In this Photo Effects tutorial, you'll learn how to add an old, antique or vintage photo effect to an image using the Camera Raw Filter in Photoshop CC (Creative Cloud). We'll start by creating a custom black and white version of our image before applying a sepia tone for an old fashioned look. We'll add grain and a vignette effect, and make the image look like it has faded over time by toning down the highlights, lightening the shadows and reducing contrast in the midtones, all from within the Camera Raw Filter itself. We'll also combine the Camera Raw Filter with a Smart Object to keep the effect both fully editable and non-destructive, allowing us to go back and edit our settings at any time and keep the effect completely separate from the image itself, leaving the original photo untouched and unharmed.
The Camera Raw Filter in Photoshop CC gives us the best of two worlds - virtually all of the editing tools, options and power of the full version of Adobe Camera Raw, and the creative freedom to apply that power as a filter to individual layers in our documents! To get the most from this tutorial, you'll need to be using Photoshop CC. For Photoshop CS6 users, you won't have access to the Camera Raw Filter in Photoshop itself, but you can still create this same effect using the same Camera Raw settings. You'll just need to open your image in Adobe Camera Raw rather than in Photoshop. If you're using an older version of Photoshop, you'll want to check out our original Turn A New Photo Into An Old Photo tutorial.
Here's the image I'll be working with (woman in vintage suit photo from Shutterstock):

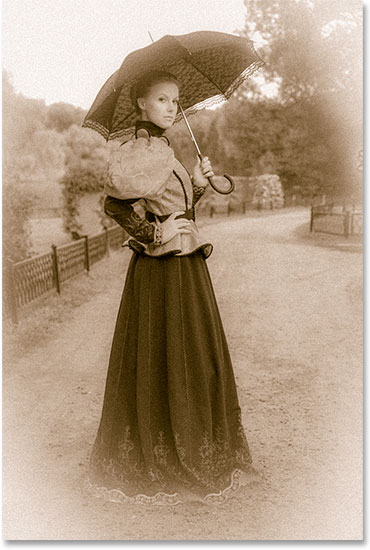
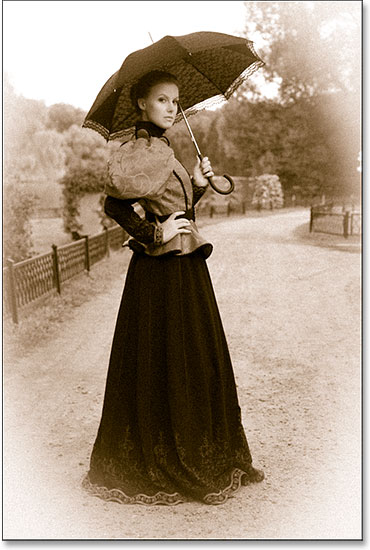
And here's what the final antique photo effect will look like:
Let's get started!
How To Create A Vintage Photo Effect
Step 1: Convert The Background Layer Into A Smart Object
Before we begin, let's take a quick look at my Layers panel. I've just opened my image in Photoshop, and we can see the image sitting on the Background layer, currently the only layer in my document (and in fact, it will remain the only layer in my document even after the effect is complete):

In a moment, we'll use the Camera Raw Filter to create our antique photo effect, but in order to keep the effect fully editable, we'll need to apply the filter as a Smart Filter. And for that, we first need to convert the layer our image is sitting on into a Smart Object. Click on the small menu icon in the top right corner of the Layers panel:
Then choose Convert to Smart Object from the menu that appears:

Nothing will happen to the image in the document window, but if we look again in the Layers panel, we see that a small Smart Object icon has appeared in the lower right corner of the layer's preview thumbnail, letting us know the layer is now a Smart Object:
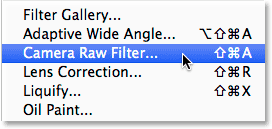
Step 2: Select The Camera Raw Filter
Now that our layer has been converted to a Smart Object, we can apply the Camera Raw Filter. Go up to the Filter menu in the Menu Bar along the top of the screen and choose Camera Raw Filter:
This opens Photoshop's Camera Raw Filter dialog box, with the image appearing in the main preview area:

If the Camera Raw Filter isn't already appearing in full screen, click the Full Screen Mode icon in the upper right (just to the left of the histogram) to switch it to full screen so you can get a better view of what you're doing. You can also just press the letter F on your keyboard to toggle Full Screen Mode on and off:
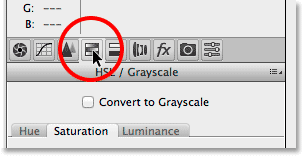
Step 3: Open The HSL / Grayscale Panel
The various Camera Raw panels are located in the column along the right hand side, and the Basic panel opens for us by default. We'll come back to the Basic panel later. There's other panels we can choose from as well which we can access by clicking on the various tabs just above the panels. To create our old antique photo effect, let's start with the HSL / Grayscale panel. Click on its tab to open it (fourth tab from the left):
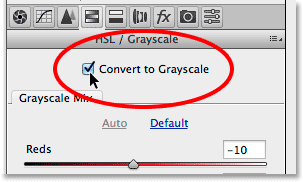
Step 4: Create A Custom Black And White Version
We can use the HSL / Grayscale panel to create a custom black and white version of our image. First, select the Convert to Grayscale option by clicking inside its checkbox. As soon as you select this option, you'll see your image in the preview area switch to black and white:
Then, drag the individual color sliders (Reds, Oranges, Yellows, Greens, Aquas, Blues, Purples, Magentas) either right or left to lighten (right) or darken (left) any areas in the black and white version that originally contained those colors. For example, dragging the Reds slider towards the right will lighten any areas in the black and white version that originally contained red. Dragging the Greens slider towards the left will darken any areas that contained green, and so on. If you drag a slider and nothing happens, it's because no part of your image contained that particular color. Keep an eye on your image in the preview area as you drag the sliders to judge the results:
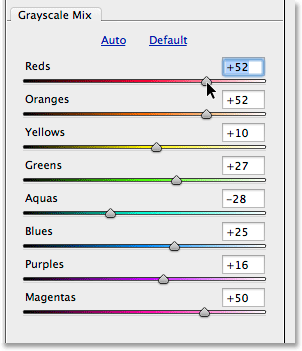
Continue experimenting with the color sliders until you're happy with your black and white conversion. Here's what my result looks like in the preview area:

Step 5: Open The Split Toning Panel
Open the Split Toning panel by clicking on its tab (directly to the right of the HSL / Grayscale tab):

Step 6: Add A Sepia Tone
Using the Split Toning panel, we can add a sepia tone to our black and white image, and we do that using the Hue and Saturation options. There's two sets of Hue and Saturation options, one for the highlights (the lighter areas) of the image and one for the shadows (the darker areas). For the Highlights set at the top, set the Hue to 40 (which gives us a nice orange-yellow) and the Saturation to 20. Note that you won't actually see any change in the hue until you increase the saturation from its default value of 0.
Then, in the Shadows set at the bottom, use a slightly different Hue value of 45 (just for a little variety) and increase the Saturation value to 50 for a more intense effect in the shadows:

Here's my image in the preview area with the sepia toning applied:

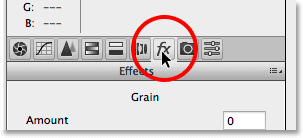
Step 7: Open The Effects Panel
Two panels down, two more to go. Open the Effects panel by clicking on the fx tab (third tab from the right):
Step 8: Add Grain To The Image
The Effects panel is limited to just two effects - grain and vignetting - but both will help us out with the antique photo effect we're creating. Let's start by adding some grain. The three sliders in the Grain section at the top of the panel let us adjust the amount, size and roughness of the grain. You can experiment with these sliders on your own to find the settings you like best, or use the same settings I'm using here for my image, which are an Amount value of 50, Size set to 60, and Roughness set to 60 as well:
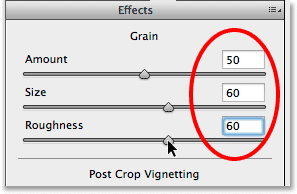
Here's a close-up view of my image to make it easier to see what the grain effect looks like:

Step 9: Add A Vignette
Next, let's move down to the Post Crop Vignetting section of the Effects panel to add a vignette effect. The main control here is the Amount slider at the top. If you drag this slider towards the left, you'll darken the edges and corners of the image. That's usually the result you want when adding a vignette, but it's the opposite of what we want for our antique photo effect. For this effect, we want to lighten the edges as if they've faded over time, and we can do that by dragging the Amount slider in the opposite direction, towards the right. I'm going to increase my Amount value all the way to +80. You can leave the other sliders set to their defaults:

Here's my image in the preview area with the vignette applied:
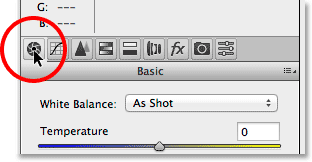
Step 10: Open The Basic Panel
We'll finish off the effect in the same panel Photoshop opened for us by default - the Basic panel. Click on its tab to open it (first tab on the left):
Step 11: Lower The Overall Contrast
Images that have faded over time have less overall contrast, and we can reduce the contrast of our image using a few simple sliders in the Basic panel. First, to tone down the highlights, click on the Highlights slider and drag it towards the left. I'll drag my Highlights value all the way down to -70, but you'll want to keep an eye on your own image as you drag the slider to judge the result. Then, to lighten the shadows, click on the Shadows slider and drag it towards the right. I'll increase my Shadows value to +80 to really lighten up the darker areas, but again, you may end up choosing a different value for your image.
Finally, to reduce the contrast in the midtones, click on the Clarity slider (third slider from the bottom) and drag it towards the left. I'll lower my Clarity value to -40 which gives me a softer looking image without losing too much detail:

And here's what my final effect looks like after reducing image contrast:

Click OK when you're done to close out of the Camera Raw Filter's dialog box:

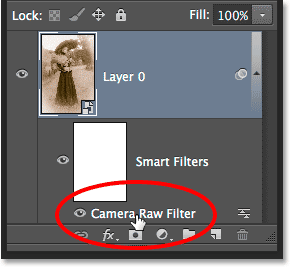
Photoshop goes ahead and applies your settings to the image, and because we applied the Camera Raw Filter to a Smart Object, it was added as a fully editable Smart Filter. We can see it listed as a Smart Filter below the image in the Layers panel. If you want to go back and re-edit any of the settings for the effect, simply double-click directly on the name Camera Raw Filter to re-open the dialog box and make your changes:
To temporarily hide the antique photo effect and view your original image, click on the visibility icon (the eyeball) to the left of the filter's name in the Layers panel:
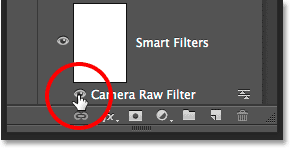
Clicking the visibility icon once turns the filter off and reveals the original, untouched photo:
Clicking the visibility icon again (click on the empty spot where the eyeball used to be) turns the Camera Raw Filter back on and brings back the effect:
And there we have it! That's how to add an old, antique or vintage photo effect to an image, keeping it fully editable and non-destructive, using the power of Smart Objects and the Camera Raw Filter in Photoshop CC (Creative Cloud)! For similar tutorials, see our Folds and Creases Effect or our Worn, Torn Photo Edges Effect". Or visit our Photo Effects section for more Photoshop effects tutorials!
Subscribe to our newsletter
Be the first the know when new tutorials are added!