How to use Select Subject in Photoshop CC 2018 for One-Click Selections
This tutorial shows you how Select Subject, new in Photoshop CC 2018, lets you select people, animals and more with a single click, and how to refine your selections with Select and Mask! We learn how Select Subject works, and we look at examples of Photoshop's newest selection feature in action!

Photoshop, in the past, has looked at images as nothing more than a collection of pixels. It knew that different pixels were different colors, and that some were brighter or darker than others. But for all its power, Photoshop couldn't see the bigger picture. It had no idea that there was a person, an animal, a tree, or any other type of object in the photo.
That's all changed in Photoshop CC 2018 thanks to some impressive artificial intelligence known as Adobe Sensei, Adobe's machine learning technology. Adobe Sensei is what powers the search engine in Adobe Stock that lets us quickly find images of people, places or other subjects. And now, Adobe has brought that same technology over to Photoshop as a brand new selection feature known as Select Subject.
Select Subject automatically finds the most prominent objects in the image and selects them! It's a bit like Photoshop's Quick Selection Tool but without the need to drag the tool around. In fact, Select Subject works with just a single click! Of course, you'll still want to refine your selection afterwards. So once we've learned all about Select Subject, we'll learn how to improve upon the initial selection using Photoshop powerful Select and Mask workspace. Select Subject was first introduced in the January 2018 Creative Cloud update, so to use it, you'll need Photoshop CC and you'll want to make sure that your copy is up to date. Let's get started!
Where To Find Select Subject
Adobe gives us three ways to access the Select Subject command in Photoshop CC 2018.
1. The Select Menu
The first way to choose Select Subject is by going up to the Select menu in the Menu Bar and choosing Subject:

2. The Options Bar
Or, if you have either the Quick Selection Tool or the Magic Wand Tool active in the Toolbar:

Then you'll find the new Select Subject button in the Options Bar:

3. The Select and Mask workspace
The third place you'll find Select Subject is in Photoshop's Select and Mask workspace. I'll open Select and Mask from the Options Bar:

In Select and Mask, the Select Subject button is found in the Options Bar along the top. Note, though, that the Select Subject option is only available when the Quick Selection Tool is active in the toolbar on the left. We'll look at how to use Select and Mask in more detail a bit later:

How Select Subject Works
Select Subject automatically detects the most prominent objects in the image and selects them, isolating them from their background. But while the technology behind Select Subject is impressive, it's important to keep your expectations in check. Rather than thinking of Select Subject as a tool that will do the entire job for you, think of it instead as a time-saving, automatic Quick Selection Tool. Like the Quick Selection Tool, Select Subject can get you 90-95% of the way there, and the fact that it does so with a single click (as we're about to see) is pretty amazing. But in most cases, just like with the Quick Selection Tool, you'll still need to refine your selection afterwards using Select and Mask.
Example 1: Selecting a single person in a photo
Let's look at some examples of Select Subject in action, starting with an image that should be an easy win for this new feature. Here we have a close-up, outdoor portrait shot. Along with Adobe Sensei's ability to recognize people in a photo, this particular image has a few important advantages that can help Select Subject along. The subject himself is in sharp focus while the background behind him is blurred out. There's a good amount of contrast between the subject and the background, and the edges along the subject are nice and sharp. We're also not dealing with lots of fly-away hair, which is always a problem for any of Photoshop's automatic selection tools (portrait photo) from Adobe Stock:

To see how good of a job Select Subject can do at isolating the man from his background, I'll make sure I have either the Quick Selection Tool or the Magic Wand Tool selected from the Toolbar, and then I'll click the Select Subject button in the Options Bar:
Photoshop takes a few moments to analyze the image and then selects our subject. To make the selection easier to see, I'll turn on Photoshop's Quick Mask mode by selecting it from the Toolbar. You can also toggle Quick Mask on and off by pressing the letter Q on your keyboard:

In Quick Mask mode, a red or rubylith overlay fills the area around the selection, making it easy to see that Select Subject did a great job of isolating the man from the background. I could have made a similar selection by dragging the Quick Selection Tool manually, but Select Subject was able to give me the same result all on its own. The selection isn't perfect of course, especially along his hair, so I would still need to refine it using Select and Mask. But considering that it took Select Subject less than 5 seconds to get this far, I'd say we're off to a good start:

Example 2: Selecting two or more people in a photo
We've looked at selecting a single person in an image, so this time, let's see if Select Subject is able to recognize two people in the same photo (ice cream photo from Adobe Stock):

I'll click Select Subject in the Options Bar, and I'll again turn on Quick Mask mode so we can better see the result. Sure enough, Select Subject had no trouble detecting and selecting both people even though they were on opposite sides of the image. Again, the selection isn't perfect, but with just a single click, I already have a great starting point:

Example 3: Two people with only one in focus
In the previous example, both people in the photo were in sharp focus. But what happens when only one person is in focus and the other is out of focus in the background? Let's use this third image to test it out (friend in background photo from Adobe Stock):

This time, even though there are again two people in the image, Select Subject was able to use the depth of field to figure out that the woman on the right (the one in sharp focus) is in fact the main subject, while the woman on the left is really part of the background. So along with being able to recognize people, Select Subject also uses other visual cues, like contrast and depth of field, when making selections:

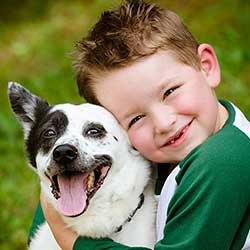
Example 4: Pets are people too!
Of course, Select Subject can detect more than just people. In this fourth example, we have a young boy and also his pet dog. Can Select Subject select two different types of subjects in the same photo? Let's find out (boy with dog photo from Adobe Stock):

As it turns out, the answer is yes. Since the boy and his dog are both in sharp focus against the blurry background, Select Subject had no trouble figuring out that both are important and that both should be selected:

How To Refine The Selection Using Select And Mask
So far, we've been choosing Select Subject from the Options Bar in Photoshop. But as we've seen, while Select Subject can give us a great starting point, the selections it makes are not perfect. Often, parts of your subject will be missing while areas of the background will still need to be removed. The edges around your subject will also need some cleaning up. In other words, you'll almost always need to refine your selection afterwards using Select and Mask. This is why it makes the most sense to choose Select Subject not from Photoshop's Options Bar but from within the Select and Mask workspace. Let's look at an example of how to use Select Subject and Select and Mask together. I'll use the same image of the boy and his dog so we can compare the results.
Step 1: Open Select and Mask
First, in Photoshop, make sure you have one of the selection tools active in the Toolbar, and then click the Select and Mask button in the Options Bar:

This opens the image in the Select and Mask workspace:

Step 2: Choose Select Subject
To make an initial selection of your subject, click the Select Subject button at the top. If you're not seeing the button, make sure the Quick Selection Tool is active in the toolbar on the left:

In the Properties panel along the right, I'll change my View Mode from Onion Skin (the default view) to Overlay:

This gives me the same view of my selection as Photoshop's Quick Mask mode. And here we see that the initial selection made by Select Subject is exactly the same as it was before:

Step 3: Refine the selection
Once you've made your initial selection with Select Subject, it's time to refine it with the tools available in Select and Mask. The first problem I notice with my initial selection is that part of the boy's arm is missing:

Adding to the initial selection
To add that part to the selection, I'll choose the Quick Selection Tool in the Select and Mask toolbar:

Then I'll paint over that area with the Quick Selection Tool to add it. The Quick Selection Tool works the same in Select and Mask as it does in Photoshop:

Improving the selection edges
Another problem with my initial selection is that the edges along the boy's t-shirt are looking a bit rough:

I could try smoothing out the edges using the Smooth slider in the Properties panel (found in the Global Refinements section). But the problem is, I also have the boy's hair and the dog's fur that need to be added to the selection, and smoothing the edges will make the hair and fur look worse.
Instead, in the Edge Detection area of the Properties panel, I'll turn on Smart Radius, and then I'll increase the Radius value to around 20 px:

To see what's happened, I'll turn on the Show Edge option at the top of the Properties panel:

This displays only the edge of the selection, and notice that the edge now has a border around it. By increasing the Radius value, I've increased the detection area of the edge, represented by the border, and I'm asking Photoshop to look at the area within that border to see if it can improve the selection for me. The Smart Radius option lets Photoshop dynamically adjust the width of the border in different spots around the edge as needed, which usually produces better results:

I'll turn the Show Edge option back off so we can see how good of a job Photoshop was able to do. And if we look again along the boy's t-shirt, we see that the edge now looks much better, with a more natural looking softness to it:

Selecting hair and fur with Select and Mask
To help us see this next part better, I'll switch my View Mode from Overlay to On Black:

If we look at the edges along the boy's hair and the dog's fur against the black background, we see that they're already looking much better than they did initially thanks to the Radius and Smart Radius options. For comparison, here's what the original Select Subject result looked like. Notice the "cardboard cutout" effect:

And here's how much better and more natural they already look just by increasing the Radius value:

To improve the hair and fur selections even more, I'll choose the Refine Edge Brush from the toolbar:

Then, I'll simply paint along the edges of the hair to add more detail. Notice the green fringing around the hair, which is caused by the color of the background showing through. We'll fix that in a moment:

I'll do the same thing with the dog's fur, painting along its edge with the Refine Edge Brush to add more fine details into the selection. Again we see the green fringing from the background, but we'll remove that next:

Here's the result after painting with the Refine Edge Brush:

Removing the color fringing
To remove the green color fringe from the hair and fur, I'll go down to the Output Settings in the Properties panel and I'll turn on Decontaminate Colors. Then, new in Photoshop CC 2018, I'll dial back the intensity of the effect (which keeps the result from looking blotchy) by lowering the Amount value until I find the sweet spot where the green disappears. In this case, it's at a value of around 50%:

And just like that, the color fringing in the hair and fur is gone, and we're left with a great looking selection:

Related: How to access Refine Edge in Photoshop CC
Outputting the selection
To output the final selection back into Photoshop, I'll set the Output To option to New Layer with Layer Mask. Then, I'll click OK to close the Select and Mask workspace:

Viewing the result
Back in Photoshop, the Layers panel now shows our new layer, with its layer mask thumbnail, sitting above the original image on the Background layer. I'll hide the Background layer so we can see just the selected part of the image by clicking its visibility icon:

And here, after making an initial selection with Select Subject and then refining the selection with Select and Mask, is the final result:

And there we have it! That's how to use the new one-click Select Subject feature to make an initial selection of your subject, and how to refine the selection using Select and Mask, in Photoshop CC 2018! Be sure to check out other great features in CC 2018, like the new Curvature Pen Tool, a great new way to upscale your images, and how to download over 1000 more Photoshop brushes!