
How To Edit Smart Objects In Photoshop
Learn how to edit a smart object in Photoshop, and how to easily replace its contents so you can use smart objects as reusable templates!
Two powerful advantages of using smart objects in Photoshop are that we can edit their contents, and we can even replace their contents, and have our changes instantly appear in the document. Editing the contents is great for when you want to keep the same image inside the smart object and just change its appearance. But we can also replace the contents with a completely new image, making smart objects perfect for creating reusable templates! Let's see how it works. I'll be using Photoshop CC but everything is fully compatible with Photoshop CS6.
If you're not yet familiar with smart objects in Photoshop, you'll want to read through the first tutorial in this series where I cover what smart objects are and how to create them. And with that, let's get started!
What we'll be learning
To help us learn about editing and replacing a smart object's contents, we're going to convert an image into a smart object and then place it inside a frame. Once it's in the frame, we'll learn how to edit the image inside the smart object, and then how to replace it with a different image.
Here's the first image I have open in my document. I downloaded all of the images for this tutorial from Adobe Stock. This is the frame that I'll be placing the other image into:

If we look in the Layers panel, we see that I also have a second image sitting on a layer above it. I'll turn the second image on by clicking the top layer's visibility icon:
And now we see the second image. I'll convert this image into a smart object and then place it inside the frame:

Placing the image in the frame
Selecting the frame
To place the image into the frame, we first need to select the area inside the frame. I'll turn the top image off so we can see the frame by once again clicking the layer's visibility icon:
Then, I'll choose Photoshop's Polygonal Lasso Tool from the Toolbar. By default, the Polygonal Lasso Tool is nested behind the standard Lasso Tool, so I'll right-click (Win) / Control-click (Mac) on the Lasso Tool and choose the Polygonal Lasso Tool from the fly-out menu:

To select the area inside the frame, all we need to do is click with the Polygonal Lasso Tool in each of the four corners, starting in the upper left, then the upper right, down to the bottom right, and then in the bottom left. To complete the selection, click again on the starting point in the upper left corner. A selection outline now appears around the inside of the frame:

With the frame selected, I'll turn the top image back on:
And the same selection outline now appears in front of the second image. In a moment, we're going to place the top image into the selection using a layer mask. But before we do, we first need to convert the layer into a smart object:

Converting the layer into a smart object
To convert the top layer into a smart object, right-click (Win) / Control-click (Mac) directly on the layer in the Layers panel:

Then choose Convert to Smart Object from the menu:

A smart object icon appears in the layer's preview thumbnail, telling us that the layer is now a smart object:
Related: How to create smart objects in Photoshop
Adding a layer mask
To place the smart object into the selection, we'll use a layer mask. Click the Add Layer Mask icon at the bottom of the Layers panel:

Photoshop converts the selection into a layer mask, and now the image appears inside the frame:

And in the Layers panel, we see the new layer mask thumbnail beside the preview thumbnail. The reason we converted the layer into a smart object before adding the layer mask was to keep the smart object and the mask separate from each other. If we had added the mask and then converted the layer to a smart object, the mask would have become part of the smart object. We need to keep them separate, so we converted the layer to a smart object first and then added the mask:

Resizing the smart object inside the frame
The reason we need to keep them separate is so we can resize and reposition the smart object within the mask, or within the frame. To do that, click the link icon between the smart object's preview thumbnail and the layer mask thumbnail. This unlinks the smart object from its mask so we can resize and reposition the smart object without affecting the size or position of the mask itself:
Click the smart object's preview thumbnail to select the smart object:

Then go up to the Edit menu in the Menu Bar and choose Free Transform:

To resize the image within the frame, press and hold the Shift key on your keyboard, and then click and drag any of the corner handles. The Shift key locks the aspect ratio of the image as you drag so you don't distort the original shape. If you need to move the image inside the frame, click anywhere inside the Free Transform box and drag the image into place:

When you're done, press Enter (Win) / Return (Mac) on your keyboard to accept it:

How to edit the contents of a smart object
Now that we've placed the image into the frame as a smart object, let's learn how to edit the smart object's contents. Think of a smart object as a Photoshop document within your Photoshop document. And pretty much anything that we can do in the main document, we can do in a smart object.
To open a smart object and edit its contents, make sure your smart object is selected in the Layers panel. Then go up to the Layer menu in the Menu Bar, choose Smart Objects, and then choose Edit Contents:

Or, a faster way to open a smart object is to simply double-click on its thumbnail in the Layers panel:

The smart object document
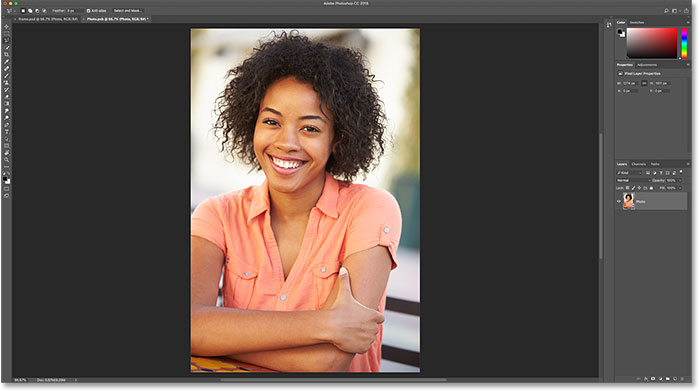
The smart object opens in its own separate document:

If we look in the document tabs along the top, we see that the name of my smart object's document is "Photo.psb". Smart objects use a special type of document known as a PSB file, which stands for "Photoshop Big". The name of the document (in this case, "Photo") is based on the name of your layer before you converted it to a smart object, which is why it's a good idea to rename your layers before converting them:

Editing the contents
Since smart objects are actual Photoshop documents, there's really no limit to what we can do with them. All of Photoshop's tools, commands, filters, and other features, like layers and adjustment layers, are available to us for editing a smart object's contents. For this tutorial, we'll keep things simple and look at a few quick examples.
Let's say I want to flip the image inside the frame so that the woman is facing the opposite direction. I can do that by flipping the image in my smart object. I'll go up to the Edit menu, then I'll choose Transform, and then Flip Horizontal:

This flips the image horizontally:
Saving the changes
To have our changes appear in the main document, we need to save and close the smart object's document. To save it, go up to the File menu and choose Save:

Then to close the smart object, go back up to the File menu and choose Close:

Back in the main document, the smart object in the frame updates to show the flipped version of the image inside it:

Editing a smart object non-destructively
Just like when editing a normal Photoshop document, it's best to edit a smart object non-destructively and avoid making any permanent changes. One of the easiest ways to do that is by taking advantage of adjustment layers. I'll reopen my smart object by double-clicking on is thumbnail in the Layers panel:

The contents reopen in the same "Photo.psb" document, and with the change that I made previously:
I'll flip the image back to the way it was originally by once again going up to the Edit menu, choosing Transform, and then choosing Flip Horizontal:
This flips the image back to its original direction:
Using a Black & White adjustment layer
Let's say I want to convert the image from color to black and white. Since smart objects are Photoshop documents, we can use adjustment layers inside them just like we can in a normal document. To convert the image to black and white, I'll click on the New Fill or Adjustment Layer icon at the bottom of the Layers panel:
And then I'll choose Black & White from the list:

A Black & White adjustment layer appears above the photo:

And in the document. we see the image now in black and white. You can customize the black and white conversion using the sliders in the Properties panel, but for our purposes, I'll stick with the default settings:

To save my changes, I'll go up to the File menu and choose Save. And then to close the smart object, I'll go back up to the File menu and choose Close. And back in the main document, we see that the smart object in the frame has once again updated, this time showing my black and white version of the image:

Using a Photo Filter adjustment layer
What if, instead of converting it to black and white, I just want to adjust the colors in the image to cool it down a bit? For that, we can use a Photo Filter adjustment layer. I'll once again reopen my smart object by double-clicking on its thumbnail:

And then in the smart object's document, I'll delete my Black & White adjustment layer by dragging it down onto the Trash Bin at the bottom of the Layers panel:

Since adjustment layers are non-destructive, deleting the adjustment layer instantly restores the original colors in the image:
To add a Photo Filter adjustment layer, I'll again click the New Fill or Adjustment Layer icon:
And this time, I'll choose Photo Filter from the list:

The new adjustment layer appears above the image:

In the Properties panel, I'll choose one of the cooling filters from the Filter menu:

This cools down the image by adding more blue:

I'll save my changes by going up to the File menu and choosing Save. Then I'll close the smart object by going up to the File menu and choosing Close. Back in the main document, the image in the frame now appears with the Photo Filter applied. And that's how to edit the contents of a smart object:

How to replace the contents of a smart object
Now that we know how to edit the contents, let's learn how to replace the contents of a smart object. Replacing the contents means we can use smart objects as templates for different layouts or effects. We already have our smart object in the frame, so let's see how to replace the image inside the smart object with a different image.
First, make sure you have your smart object selected in the Layers panel. There's no need to open it. We just need to select it:

To replace its contents, go up to the Layer menu, choose Smart Objects, and then choose Replace Contents:

Navigate to the image that you want to replace the contents with. Click on it to select it, and then click Place:

And instantly, the original image in the smart object is replaced with the new image. The only problem is that the new image is too big to fit in the frame, so we'll fix that next:

Resizing the contents
To resize the new image, I'll do the same thing I did with my previous image by going up to the Edit menu and choosing Free Transform:
Then, I'll press and hold my Shift key as I drag the corner handles to fit the new image into the frame. Again, the Shift key locks the aspect ratio of the image in place:

To accept it, I'll press Enter (Win) / Return (Mac) on my keyboard. And now, after replacing the contents of the smart object, my new image fits perfectly in the frame:

And there we have it! That's how to edit and replace the contents of a smart object in Photoshop! For more on smart objects, learn how to open and place images as smart objects, how to scale and resize images without losing quality, how to use editable smart filters, or how smart objects make it easy to transform and distort type! You'll also find many more tutorials in our Photoshop Basics section.
Subscribe to our newsletter
Be the first the know when new tutorials are added!