How To Add Falling Snow To Your Photos With Photoshop
Don't let Mother Nature leave you out in the cold with your winter photography. Learn how to add your own falling snow to your photos with this easy to create Photoshop snow effect!
Winter is my favorite season. But winter photography can be a challenge, and not just because the cold plays havoc on your camera batteries (and your ears). Nothing adds to the beauty of a winter landscape like falling snow, but how do you photograph snow if it isn't snowing? Thankfully, Photoshop makes it easy to create realistic falling snow and add it to your photos even if it wasn't snowing when you shot them. All it takes to make snow in Photoshop is a couple of filters and adjustment layers. Let's see how it works!
I'll be using Photoshop CC but every step is fully compatible with Photoshop CS6.
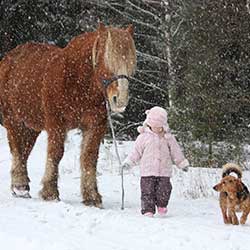
Here's the image I'll be using (girl in winter forest photo from Shutterstock):

And here's what the Photoshop snow effect will look like when we're done:

Let's get started!
How To Add Falling Snow In Photoshop
Step 1: Add A New Blank Layer Named "Snow"
If we look in the Layers panel, we see the original image sitting on the Background layer. Let's begin creating our snow effect by adding a new blank layer above the image. Press and hold the Alt (Win) / Option (Mac) key on your keyboard and click the New Layer icon at the bottom of the Layers panel:
The Alt / Option key tells Photoshop to pop open the New Layer dialog box where we can name the new layer before it's added. Name the layer "Snow", and then click OK to close the dialog box:

Photoshop adds our new "Snow" layer above the Background layer:

Step 2: Fill The New Layer With Black
Fill the new layer with black by going up to the Edit menu in the Menu Bar along the top of the screen and choosing Fill:

In the Fill dialog box, set the Contents option at the top to Black, and then click OK:

Photoshop fills the "Snow" layer with black. And because the "Snow" layer is sitting above the Background layer, the black temporarily hides our photo from view:

Step 3: Apply The Add Noise Filter
To create the falling snow, we'll use Photoshop's Add Noise filter. Go up to the Filter menu in the Menu Bar, choose Noise, and then choose Add Noise:

This opens the Add Noise dialog box. The Add Noise filter adds a bunch of random dots (noise) to the layer. These dots will become our snowflakes. Set the Amount value to 25%. In the Distribution section, choose Gaussian. Then make sure Monochromatic at the very bottom is selected, which will limit the color of the noise to just black and white. Click OK to close the dialog box:

Photoshop fills the "Snow" layer with noise. The noise looks a bit faint, but we'll brighten it up in a moment:

Step 4: Increase The Size Of The Noise
Along with being too faint, the dots are also too small. Let's make them bigger using Photoshop's Scale command. Go up to the Edit menu in the Menu Bar, choose Transform, and then choose Scale:

In the Options Bar, click the small link icon between the Width (W) and Height (H) values. This will link Width and Height together so that changing one will automatically change the other:

Change the Width value to 400%. Photoshop sets the Height to 400% to match:

Click the checkmark in the Options Bar to accept it:

With the dots now much bigger, they're starting to look more like snow:

Step 5: Change The Layer Blend Mode To Screen
Another problem with the noise is that it's completely blocking our photo from view. To fix that, change the blend mode of the Snow layer from Normal (the default setting) to Screen:

The Screen blend mode hides all the areas of black on the layer, leaving only the white noise visible:

Step 6: Apply The Motion Blur Filter
To make the snow look like it's falling, not frozen in time, we'll add a bit of motion to it. For that, we'll use Photoshop's Motion Blur filter. Go up to the Filter menu, choose Blur, then choose Motion Blur:

This opens the Motion Blur dialog box. First, set the Angle to the direction you want the snow to be falling from. You can enter a value directly or you can rotate the dial. I'll set the angle to -65° so the snow is falling from the upper left. The Distance option controls how much motion is applied. Setting Distance too high will make the snow look more like rain, so use a low value of between 8 to 12 pixels depending on the size of your image. Click OK when you're done to close the dialog box:

Here's the effect after applying the Motion Blur filter. I've zoomed in on an area to make the snow easier to see:

Step 7: Add A Levels Adjustment Layer
Next, we'll reduce the amount of snow, and also brighten it up at the same time, using a Levels adjustment layer. Click the New Fill or Adjustment Layer icon at the bottom of the Layers panel:
Choose Levels to add a Levels adjustment layer above the "Snow" layer:

Step 8: Create A Clipping Mask
We need the Levels adjustment layer to affect only the "Snow" layer, not the original image. To do that, we'll create a clipping mask. Click the menu icon in the upper right corner of the Layers panel:
Choose Create Clipping Mask from the list:

This clips the adjustment layer to the layer directly below it so that only the "Snow" layer will now be affected:

Related: How to use Clipping Masks in Photoshop
Step 9: Drag The Black Point And White Point Sliders
The options and controls for the Levels adjustment layer appear in Photoshop's Properties panel. In the center of the panel is the histogram, a graph showing the current tonal range of the image (or in this case, of the "Snow" layer). If you look directly below the histogram, you'll find three sliders. There's a black point slider on the far left, a white point slider on the far right, and a midtones slider (the gray slider) in the middle. You can ignore the gray midtones slider. All we need are the black and white ones:

To reduce the amount of snow, click on the black slider and begin dragging it to the right. Keep an eye on your image as you drag and you'll see the darker areas of snow becoming even darker, and eventually disappearing completely. Then, to brighten up the remaining snow, and increase its overall contrast, click on the white slider and begin dragging it to the left. The further you drag, the brighter the snow becomes. You can go back and forth with the two sliders to fine-tune the results:

Here's my snow effect after dragging the sliders. There's now less snow than there was before, and the remaining snow is brighter:

Step 10: Duplicate The "Snow" And Levels Layers
Let's add some depth to our Photoshop snow effect by creating a second layer of snow, this time with bigger snowflakes so they'll look like they were closer to the camera. To do that, we'll need to make a copy of both our "Snow" layer and the Levels adjustment layer above it. The adjustment layer is already selected in the Layers panel. To select the "Snow" layer as well, press and hold the Shift key on your keyboard and click on the "Snow" layer. Both layers are now highlighted:

Click and drag the two layers down onto the New Layer icon at the bottom of the Layers panel:
Release your mouse button and Photoshop adds a copy of both layers above the originals. The copies have the word "copy" in their names:

Step 11: Select The "Snow copy" Layer
Click on the "Snow copy" layer to select it. This will also deselect the adjustment layer above it:

Step 12: Rotate The Layer 180°
Let's rotate the "Snow copy" layer so that these new snowflakes are adding to the amount of snow in the photo, not just sitting on top of the originals. Go up to the Edit menu, choose Transform, then choose Rotate 180°:

With the layer rotated, the copied snowflakes are still falling at the same angle as the originals. But because they're spaced out differently, we now have twice as much snow as we did before:

Step 13: Apply The Crystallize Filter
We need to make these new snowflakes bigger than the originals. We could just scale the layer again, but let's try something different. This time, we'll use Photoshop's Crystallize filter. Go up to the Filter menu, choose Pixelate, then choose Crystallize:

This opens the Crystallize dialog box. The Crystallize filter breaks an image into little sections, or “cells”, of color. We adjust the size of the cells with the Cell Size option at the bottom of the dialog box. A value of 10 to 20 usually works well for this effect. Since my image is fairly large, I'll go with the higher value of 20. Click OK to close the dialog box:

Photoshop may need a few moments to complete the effect, but when it's done, the new snowflakes will appear larger than the originals:

Step 14: Apply The Motion Blur Filter
To add motion to the larger snowflakes, go back up to the Filter menu, choose Blur, and once again choose Motion Blur:
In the Motion Blur dialog box, leave the Angle set to the same value as last time. But since these new snowflakes are larger than the originals, increase the Distance value to somewhere between 16 to 20 pixels, again depending on the size of your image. Click OK when you're done:
Here's the effect with the motion blur applied to the larger snowflakes:
Step 15: Re-Adjust The Levels Sliders
Finally, to fine-tune the appearance of the larger snowflakes, click on the "Levels 1 copy" adjustment layer above the "Snow copy" layer to select it. To make sure you select the layer itself, not its layer mask, click on the small histogram icon:

Just as before, the controls for the adjustment layer appear in the Properties panel. Drag the black point and white point sliders left or right to make any adjustments you need. Reduce the amount of snow with the black slider and increase the brightness with the white slider. This time, we're affecting only the larger snowflakes on the "Snow copy" layer. The originals (on the original "Snow" layer) are not affected:

And with that, we're done! Here, after fine-tuning the larger snowflakes, is my final "Photoshop snow effect" result:
And there we have it! That's how to easily add snow to a photo with Photoshop! Did you know that the same basic steps for adding snow can also be used to create other Photoshop effects? Learn how to easily add rain to a photo or even add stars to your night skies with Photoshop! Or visit our Photo Effects section for more Photoshop effects tutorials!