
How To Create A New Document In Photoshop CC
Learn how to create new documents in Photoshop using the redesigned New Document dialog box in Photoshop CC. You'll learn how to create new documents from presets and by using your own custom document sizes. You'll also learn how to save your custom settings as new presets!
To follow along with this tutorial, you'll want to be using Photoshop CC and you'll want to make sure that your copy of Photoshop CC is up to date. This is lesson 3 of 10 in Chapter 2 - Opening Images into Photoshop. Let's get started!
Creating New Documents vs Opening Images In Photoshop
Before we begin, let's talk briefly about the difference between creating a new document in Photoshop and opening an existing image into Photoshop. When we create a new Photoshop document, we create what is essentially a blank canvas. Once we've created the canvas (the document), we can then import images, graphics or other design assets into it. New documents are perfect for design layouts, whether for print or for the web. You simply create a new blank document at the size you need and then begin adding and arranging your various elements.
New documents are also great for digital painting with Photoshop's brushes, and for creating composites from multiple images. Basically, any time you want to start with a blank canvas and then add your content as you go, you'll want to create a new Photoshop document. We'll learn how to create new documents in this tutorial.
If you're a photographer, rather than creating a new document, you'll most likely want to start by opening an existing image into Photoshop. Opening images is different from creating new documents. We've already learned how to set Photoshop as our default image editor for both Windows and Mac. We'll learn other ways of getting our images into Photoshop beginning with the next tutorial in this series, How to open images in Photoshop CC.
Creating A New Photoshop Document
To create a new document in Photoshop, we use the New Document dialog box. There's a few ways to get to it. One way is by clicking the Create new button on Photoshop's Start screen:

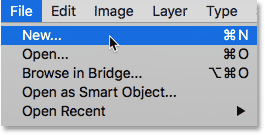
Another is by going up to the File menu in the Menu Bar along the top of the screen and choosing New. This is helpful if you already have one or more documents open and don't have access to the Start screen, or if you've disabled the Start workspace:
Or, you can use the keyboard shortcut, Ctrl+N (Win) / Command+N (Mac). Any way you choose opens the New Document dialog box:

The New Document Dialog Box
Along the top of the New Document dialog box is a row of categories (Recent, Saved, Photo, Print, Art & Illustration, Web, Mobile, and Film & Video). By default, the New Document dialog box opens to the Recent category. Any document sizes you've used recently will appear as thumbnails in the Recent Items area below.
In my case, all I'm seeing at the moment is the default Photoshop size but you may be seeing others as well if you've already created one or more new documents. We'll come back to the Recent category a bit later:

Creating New Photoshop Documents From Presets
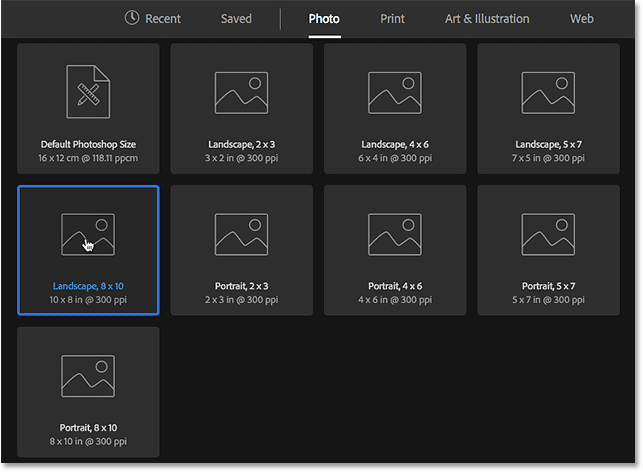
The best way to start when creating a new Photoshop document is to see if there's already a preset we can use that matches the size we need. First, choose the type of document you want to create (photo, web, mobile, etc.) from the categories along the top. I'll choose Photo:

Preset document sizes for your chosen category will appear below. Only a few presets are displayed at first. To see more of them, click View All Presets +:

Use the scroll bar along the right to scroll through the presets. If you see one that matches your needs, click on it to select it. I'll choose Landscape, 8 x 10:
The Preset Details Panel
The details of the preset appear in the Preset Details panel along the right of the dialog box. After choosing the Landscape, 8 x 10 preset, we see that sure enough, this preset will create a document with a Width of 10 inches and a Height of 8 inches. It also sets the Resolution to 300 pixels/inch which is a standard resolution for print:

If you're happy with the settings, click the Create button in the bottom right of the dialog box:

This closes the New Document dialog box and opens your new document in Photoshop:

Verifying The Document Size
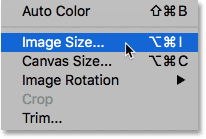
If you're the skeptical type, you can verify that the document is the size you wanted using Photoshop's Image Size dialog box. To do that, go up to the Image menu at the top of the screen and choose Image Size:
This opens the Image Size dialog box where we see that the Width of the document is in fact 10 inches, the Height is 8 inches, and the Resolution is set to 300 pixels/inch:

I'll close out of the Image Size dialog box by clicking the Cancel button:

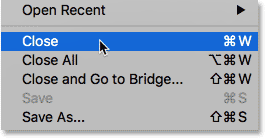
Then, I'll close out of my new document by going up to the File menu and choosing Close:
Since I have no other documents open at the moment, Photoshop returns me to the Start screen. I'll open the New Document dialog box once again by clicking the Create new button:
The New Document dialog box again opens to the Recent category where this time, it's displaying not only the default Photoshop size but also the Landscape, 8 x 10 preset that I just used. If I wanted to quickly create a new document using either of these sizes, all I would need to do is double-click on the one I need:

Creating New Documents From Custom Settings
If none of the presets will work, we can easily use our own custom settings simply by entering whatever values we need into the Preset Details panel (which should probably have been called the Document Details panel since we're no longer using a preset).
If I want to create, say, a 13 inch by 19 inch document, all I need to do is set the Width value to 13 inches and the Height value to 19 inches. I'm using inches here as an example, but if you click the measurement type box, you'll find options for other measurement types as well, like pixels, centimeters, millimeters and more:

If you need to swap the Width and Height values to change the orientation of the document, click either the Portrait or Landscape orientation buttons:

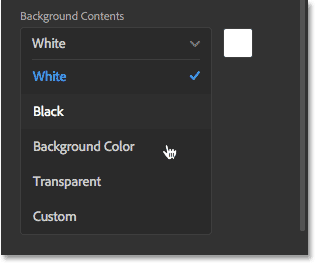
Any of the settings in the Preset Details panel can be changed as needed. To change the background color of your new document to something other than white (the default color), click on the Background Contents option where you'll see that you can also choose black, or you can choose your current Background color, or you can choose Transparent. Choosing Custom or clicking the color swatch will open Photoshop's Color Picker where you can choose any color you need:
Color Mode And Bit Depth
Other options we can change in the Preset Details panel include the document's Color Mode where we can choose from RGB, CMYK, Grayscale and others. In most cases, you'll want to leave it set to RGB Color. If you're interested in learning more about RGB color, be sure to check out our RGB And Color Channels Explained tutorial.
You can also change the document's Bit Depth, from 8 bit to 16 bit or 32 bit. This is a more advanced topic, but I cover the difference between 8 bit and 16 bit in our Benefits Of Working With 16-Bit Images tutorial. You can safely leave it set to 8 bit:

When you're happy with your settings, click the Create button in the bottom right of the dialog box. I'm not going to do that just yet, though, because in the next section, we'll learn how to save our settings as a custom preset!
Saving Your New Document Settings As A Preset
If you know you'll need the same document size again in the future, you can save your settings as a custom preset. To do that, click the Save icon at the top of the Preset Details panel:

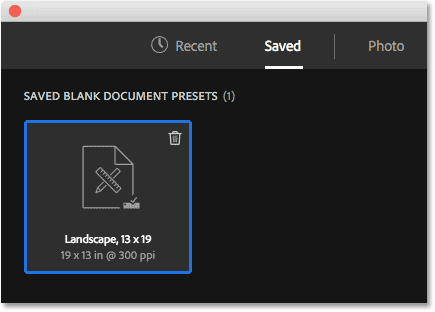
Give your preset a descriptive name. I'll name mine "Landscape, 13 x 19". Then, click the Save Preset button:

The New Document dialog box will open to the Saved category where you'll find your new preset, along with any other presets you've created. To use the preset in the future, simply open the Saved category and double-click on the preset's thumbnail:
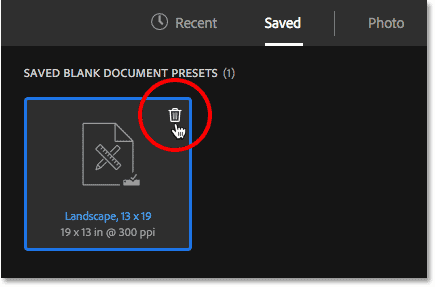
Deleting A Saved Preset
If you need to delete the preset at some point, click the trash bin icon in the upper right of the thumbnail:
Now that I've saved my settings as a preset, I'll create the new document by clicking the Create button in the bottom right corner:
This once again closes the New Document dialog box and opens my new document in Photoshop:

How To Restore Photoshop's Legacy New Document Dialog Box
Finally, if you're a long-time Photoshop user, you may feel like the redesigned New Document dialog box in Photoshop CC is a bit too much. Personally, I've grown to like it, but if you prefer the old style dialog box, you can easily switch back to it using Photoshop's Preferences.
On a Windows PC, go up to the Edit menu at the top of the screen, choose Preferences, and then choose General. On a Mac, go up to the Photoshop CC menu, choose Preferences, then choose General. Or, you can use the keyboard shortcut, Ctrl+K (Win) / Command+K (Mac):

This opens the Preferences dialog box set to the General options. Look for the option that says Use Legacy "New Document" Interface and click inside its checkbox to enable it:
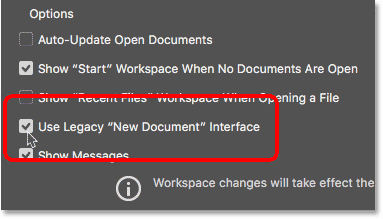
Click OK to close the Preferences dialog box. The next time you go to create a new document, the New Document dialog box will appear in its more streamlined, original form. To switch to the redesigned version, just go back to the same option in Photoshop's Preferences and uncheck it:

Where to go next...
And there we have it! In the next lesson in this series, we'll learn how to open an existing image in Photoshop!